Foveated rendering and MSAA in PlayCanvas
- Noeri Huisman
- April 15, 2026
PlayCanvas is a 3D game engine that comes with an online editor and WebXR support. It’s great for authoring web based XR experiences. Creating graphically intensive WebXR applications on devices like the Meta Quest 3, while maintaining 90 FPS is real challenge. Techniques like fixed foveated rendering (FFR) and multisample anti-aliasing (MSAA) are essential for visual quality and performance, but PlayCanvas does not support both at the same time. Let’s dive in.
Info
Only interested in trying it out in your own PlayCanvas WebXR project?
Head over to “VR patches (FFR + AA)”, copy the webxr-tweaks.mjs script into your own project and add the webxrTweaks component to your scene.
The Problem
Foveated rendering allows rendering at a lower resolution near the edges of the user’s vision. While this is ideally done based on eye tracking data to keep the area the user is looking at high-resolution, there is a crude and simple alternative: fixed foveated rendering (FFR). The user is likely to look at the center of the frame. FFR uses this assumption and always renders the center part at full resolution, while reducing the resolution near the edges of the frame.
WebXR supports FFR and PlayCanvas even implements it. When enabled, however, you’ll likely be greeted with the following warning:
Fixed Foveation is ignored. Disable anti-aliasing for it to be effective
Turns out that multisample anti-aliasing (MSAA) and FFR are mutually exclusive in PlayCanvas. This is a shame as disabling anti-aliasing results in so-called “jaggies”. Not to mention that FFR is a great way to offset the performance cost of MSAA. We really want to have both at the same time, so let’s get it working.
Underlying cause
Every frame the final rendered image needs to end up in the default framebuffer. For WebGL this is generally the HTMLCanvasElement, whereas for WebXR this is the XRWebGLLayer.framebuffer provided by the WebXR API. It doesn’t matter how the image ends up there, as long as it does. You can draw directly to this framebuffer, or render to a different framebuffer and copy the result at the end.
PlayCanvas uses the latter, creating its own back buffer. Since this back buffer will be multisampled, the default framebuffer doesn’t have to be. Perfectly fine setup, apart from the fact that the default framebuffer provided by the WebXR API is a bit unique. Setting the fixedFoveation enables FFR for the provided framebuffer only. This explains why it does not work in tandem with MSAA in PlayCanvas. FFR is applied to the default framebuffer, while MSAA is applied to the back buffer. We need both on the same framebuffer.
This is where the recently added foveateBoundTexture in the WebXR Layers API comes in. It allows applying FFR to any texture, making it possible to workaround this issue. FFR can now be applied to the back buffer as well.
Monkey patching
The solution presented here is going to monkey-patch a handful of methods in PlayCanvas. While a proper solution built into the engine would be nicer, especially in the long run, this crude approach does make it easy for others to use it and benefit immediately. Check out the webxr-tweaks.mjs script in the “VR patches (FFR + AA)” project for the full code.
The main method to patch is createBackbuffer, which, as the name implies, is responsible for creating the back buffer. Since the returned result is lazily initialized, we’ll also patch its init method so that the foveation can be applied, as follows:
const graphicsDevice = app.graphicsDevice;
graphicsDevice.createBackbuffer = function(frameBuffer) {

    // ...

    this.backBuffer = new RenderTarget({
        name: 'WebXR Framebuffer',
        graphicsDevice: this,
        depth: this.initOptions.depth,
        stencil: this.supportsStencil,
        samples: this.samples
    });

    this.backBuffer.impl.init = function(device, target) {

        // ... Setup MSAA framebuffer

        // Apply foveation
        app.xr.webglBinding.foveateBoundTexture(gl.TEXTURE_2D, foveationLevel);

    };
};
Since the back buffer creation is being patched, there’s one more thing we can improve while we’re at it. The Meta Quest browser supports a WebGL2 extension called WEBGL_multisampled_render_to_texture. This allows rendering with MSAA to a non-multisampled texture, saving a significant amount of bandwidth and GPU memory usage.
Results
I’ve measured the App GPU time and the gpu memory usage on a Quest 3 for three scenarios. The out-of-the-box setup of PlayCanvas. The monkey-patched version, but without any FFR. And finally the patched version with FFR fully enabled. The following graphs show the results, normalized, such that the value 1.0 corresponds to the base case:
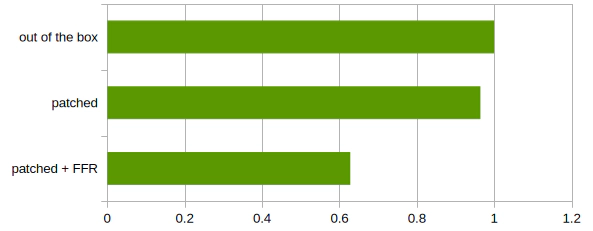
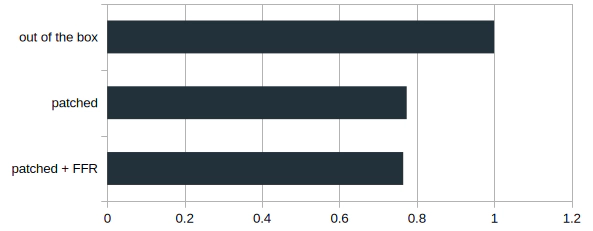
The results speak for themselves. Even without enabling FFR, the patched version already achieves GPU memory reduction thanks to the WEBGL_multisampled_render_to_texture extension. Additionally there is a small performance gain, as the patched version avoids a StoreDepthStencil render stage. Enabling FFR shows the real performance gain. Important to note that the memory saving is a fixed amount, theoretically saving ~67MiB (~60MiB savings were observed).
Check it out yourself. Simply head over the “VR patches (FFR + AA)” project. As is always the case with monkey-patching, future updates might break it, so use at your own risk.