A-Frame Adventures 03 - Projecting textures
- Noeri Huisman
- May 23, 2022
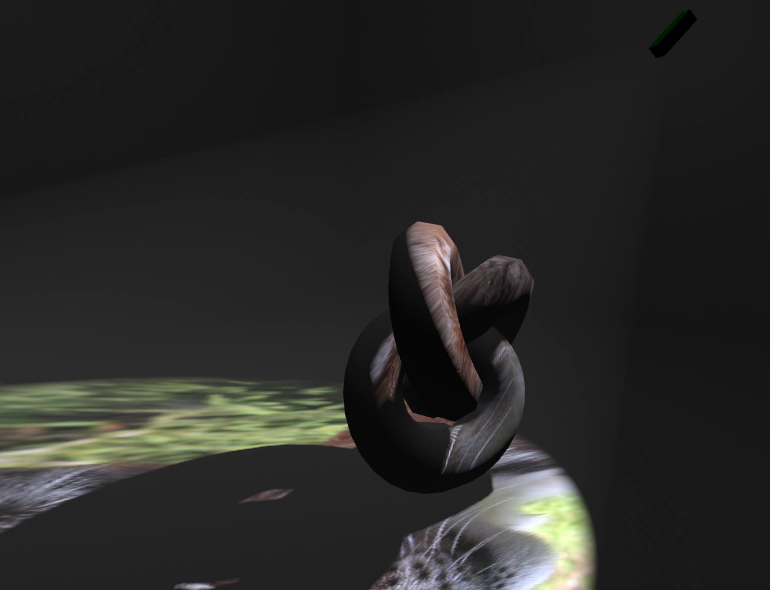
Lighting is an important aspect of any 3D scene. When using dynamic lights, there are typically a handful of light types that can be used. In the spotlights today is… the spotlight. With a little bit of effort it can not only illuminate the scene with a solid colour, but project an actual image onto the scene. This allows it to be used as a projector or to give texture to light from a flash light and more. Check out the online demo
How spotlights work
Spotlights emit light in a cone shape. They are defined using a position in space, a direction and an angle. The greater the angle, the wider to cone is. The illustration below shows a simple spotlight in 2D:
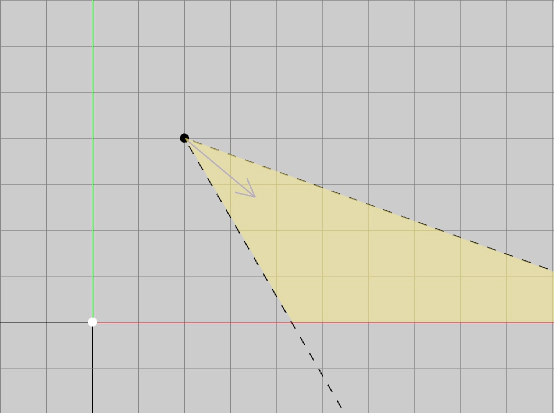
To project an image, the rays of light are going to be coloured based on a texture. For each ray of light a sample point on the texture needs to be computed. In the image above, the bottom of the texture should line up with the leftmost intersection of the spotlight’s cone with the ground. The top of the texture should line up with the rightmost intersection point (off to the right of the image).
Which way is up?
There is however one small issue. If a spotlight is only defined by its position, direction and angle, there is no definitive way to orientate the image it is projecting. A fixed world orientation could work, but part of the fun is rotating the projected image. A simple way to indicate the orientation is to keep track of an up vector for each spotlight.
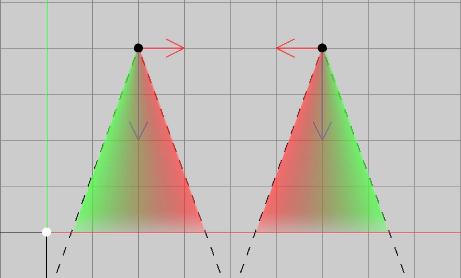
Both spotlights in the above image are pointing in the same direction, but have a different up vector. Even though they are projecting the same image, the images are orientated differently. The top of the image (red) is always on the side that the up vector is pointing to.
Spotlights in ThreeJS
Now let’s see how ThreeJS handles spotlights and how we can add our textures and up-vectors to it. The focus will be on the shader code. In ThreeJS the SpotLight struct is defined as follows:
struct SpotLight {
	vec3 position;
	vec3 direction;
	vec3 color;
	float distance;
	float decay;
	float coneCos;
	float penumbraCos;
};

uniform SpotLight spotLights[ NUM_SPOT_LIGHTS ];
It’s tempting to just add the up vector to this struct. That would be the cleaner solution, but requires changes to the internals of ThreeJS. Instead, some shortcuts will be taken by patching the shaders of ThreeJS and manually updating additional uniforms. So besides the existing SpotLight struct, extra unfiroms will be added:
struct SpotLightEx {
	vec3 up;
	float intensity;
};

uniform sampler2D spotLightTextures[ NUM_SPOT_LIGHTS ];
uniform SpotLightEx spotLightExs[ NUM_SPOT_LIGHTS ];
An intensity property has been added as well, this will be used to increase the intensity of the projected image.
With this additional information the spotlight glsl code can be expanded. Below is the spotlight glsl code from ThreeJS. Simply put, if the spotAttenuation is greater than 0, the fragment is inside the cone of the spotlight. The section our code will be added has been marked:
void getSpotLightInfo( const in SpotLight spotLight, const in GeometricContext geometry, out IncidentLight light ) {
	vec3 lVector = spotLight.position - geometry.position;
	light.direction = normalize( lVector );
	float angleCos = dot( light.direction, spotLight.direction );
	float spotAttenuation = getSpotAttenuation( spotLight.coneCos, spotLight.penumbraCos, angleCos );
	if ( spotAttenuation > 0.0 ) {
		float lightDistance = length( lVector );

		// ---
		// Here the fragment is being lit by the spotlight
		// Instead of spotLight.color, the color needs to come from the texture
		// ---

		light.color = spotLight.color * spotAttenuation;
		light.color *= getDistanceAttenuation( lightDistance, spotLight.distance, spotLight.decay );
		light.visible = ( light.color != vec3( 0.0 ) );
	} else {
		light.color = vec3( 0.0 );
		light.visible = false;
	}
}
Light computations
In the shader the angle of the cone of the spotlight is only present as its cosine. This is an optimization when only checking if a light ray is inside the spotlight’s cone. But since a cosine isn’t linear, it has to be converted back to radians. This allows us to compare it to the angle between the light ray and the up vector:
// Convert the cone angle cosine back into radians
float coneAngle = acos(spotLight.coneCos);

// Get the cosine between the light ray and the up vector
float upCos = dot(light.direction, spotLightEx.up);
// Convert to radians
float upAngle = acos(upCos);

// Calculate the y coordinate of the sample point
// The PI/2.0 (= 90°) is compensation for the 90° between spotlight direction and up vector
// The coneAngle extends in both directions from the center, hence the 2.0 * coneAngle
// Shift the resulting [-0.5, 0.5] range by 0.5 to get [0.0, 1.0]
samplePoint.y = 0.5	+ (upAngle - PI/2.0) / (2.0 * coneAngle);
All we have to do, is repeat the same for the x coordinate. However, this requires a left vector, which hasn’t been defined. Luckily it can be computed using the cross product of the up vector and the spotlight direction vector:
// Compute a left vector from the up vector and the spotlight direction
vec3 left = normalize(cross(spotLightEx.up, spotLight.direction));

// Get the cosine between the light ray and the up vector
float leftCos = dot(light.direction, left);
// Convert to radians
float leftAngle = acos(leftCos);

// Calculate the x coordinate of the sample point
samplePoint.x = 0.5 + (leftAngle - PI/2.0) / (2.0 * coneAngle);
With this sample point, the color of the light ray can be looked up:
color = texture(spotLightTexture, samplePoint).rgb * spotLightEx.intensity;
Hooking it all up
Now that the shader code is ready, all that’s left is to provide it with the needed information. If you want to know how this works in detail, please checkout the accompanying code at the GitHub link at the bottom. Instead I’ll focus on the most important details.
The following needs to happen:
- Allow the texture and intensity to be specified per spotlight
- Update the extra spotlight uniforms (texture, up vector, intensity) each frame.
Both can be handled by two custom A-Frame components. A spotlight-texture component will be used to specify the texture and intensity on a spotlight, and a receive-spotlight-texture component will be added to entities that should be lit by these spotlights and will handle updating the extra uniforms.
<!-- Spotlight with a texture -->
<a-entity light="type: spot; angle: 30; penumbra: 0.1; castShadow: true;" spotlight-texture="src: url(./assets/lynx.jpg); intensity: 4.0"></a-entity>

<!-- Entity that is lit by the spotlight -->
<a-torus-knot shadow="cast: true" receive-spotlight-texture></a-torus-knot>
Lighting calculations in the shaders of ThreeJS happen in camera space. As such the up vector needs to be transformed into camera space as well. This can be done as follows:
// Start with an up vector (model space)
const up = new THREE.Vector3(0.0, 1.0, 0.0);
// Transform it based on the spotLight's transform (world space)
up.transformDirection(spotLight.matrixWorld);
// Transform it based on the camera (camera space)
up.transformDirection(camera.matrixWorldInverse);
This, however, poses a tricky situation. The value now depends on the camera, and in VR there are two cameras (one per eye). Updating the uniform once for every frame won’t be enough. It needs to be updated twice per frame, right before rendering would take place. To do this, the onBeforeRender hook of ThreeJS can be used:
const material = this.el.getObject3D('mesh').material;

let shaderObject = null;
material.onBeforeCompile = (shader) => {
	updateUniforms(shader);
	shaderObject = shader;
};

material.onBeforeRender = () => {
	if(!shaderObject) { return; }
	updateUniforms(shaderObject);
}
Now it updates right on time. But this highlights the hacky nature of the approach. It would be better to fork ThreeJS and update the spotlight code, or use custom shaders all the way through instead of ‘patching’ the built-in ones. Still, this demonstrates what you can do with spotlights and a bit of shader magic.
Conclusion
A nice addition to spotlights that can really spice things up and create interesting effects. Try it out for yourself or watch this video to see different applications of it.
In some of these shots there is a volumetric effect to the spotlights. This is done using more shader magic that computes the distance the light ray travels through the spotlight’s cone. In hindsight I would recommend using billboards and faking it, as that is easier to implement, gives more artistic control and probably performs better. Though, if someone is interested and wants to know how to do it, feel free to reach out.